
Welcome to the Clipart Oasis Download School, where the only requirement is clicking buttons, and the graduation success rate is 100%! Have you ever found and downloaded the perfect clipart image and then stared at your screen like “NOW WHAT?!” while your cursor hovers aimlessly and uselessly? Fear not, Brave Internet Traveler! I’m about to turn you into an image download wizard faster than you can say “right-click!” Let’s get started, and it truly is not nearly as difficult as you may be thinking!
Step 1: Single-click one of the green download buttons underneath the image at the top of the image page to begin the download. The button on the left will result in a downloaded image that is in PNG format, and the button on the right will give you access to the same image, but in SVG format.

Step 2A: A new browser tab will open that looks like this page (but with your desired image, of course – this is just an example):
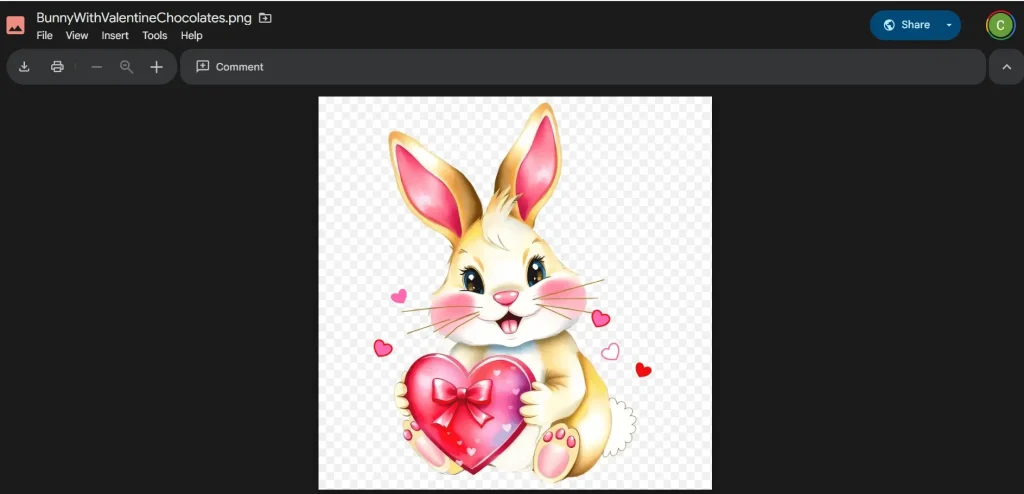
Step 2B: In rare instances, you will see a black folder as shown in the image below, rather than your desired image. No worries! You can still download the image and the image will look great! Google Drive, where the images are stored, sometimes has trouble displaying images that are in SVG format.

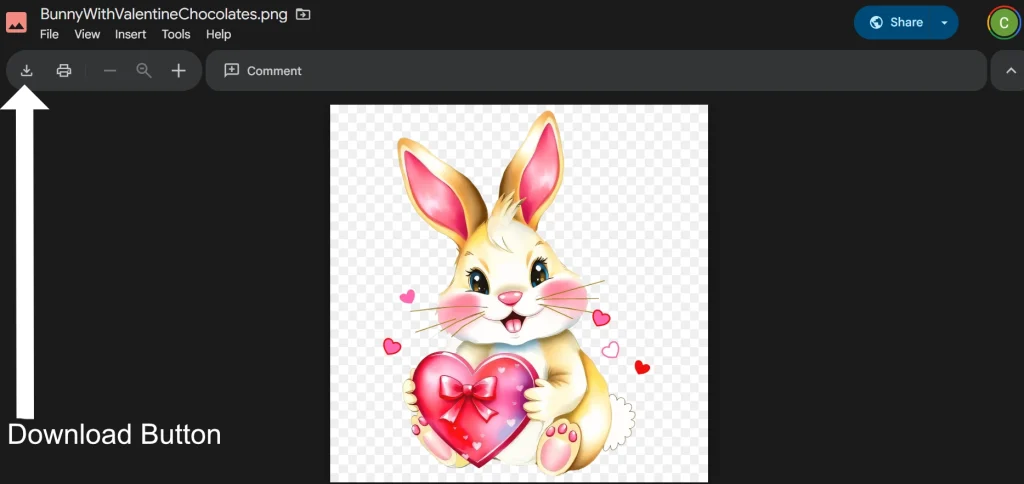
Step 3: Next, single-click the “Download” icon in the upper-left corner. Refer to the white up-arrow in the image below, which points directly at the “Download” icon. If you hover over this icon with your mouse (not in here, but instead when you are in the download process at this step), without clicking, you will see the word, “Download.”
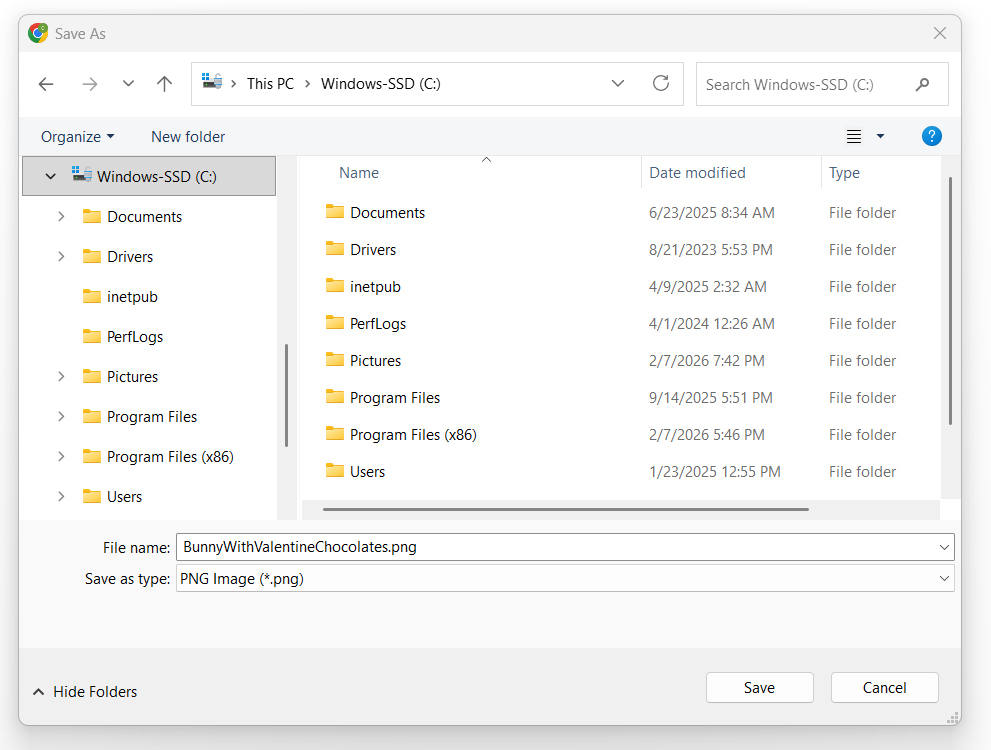
Step 4: As soon as you click the “Download” icon as in Step 3 above, a “Save As” window will open that looks like the image below. Get ready to do your HAPPY DANCE! You are very close to getting through this!
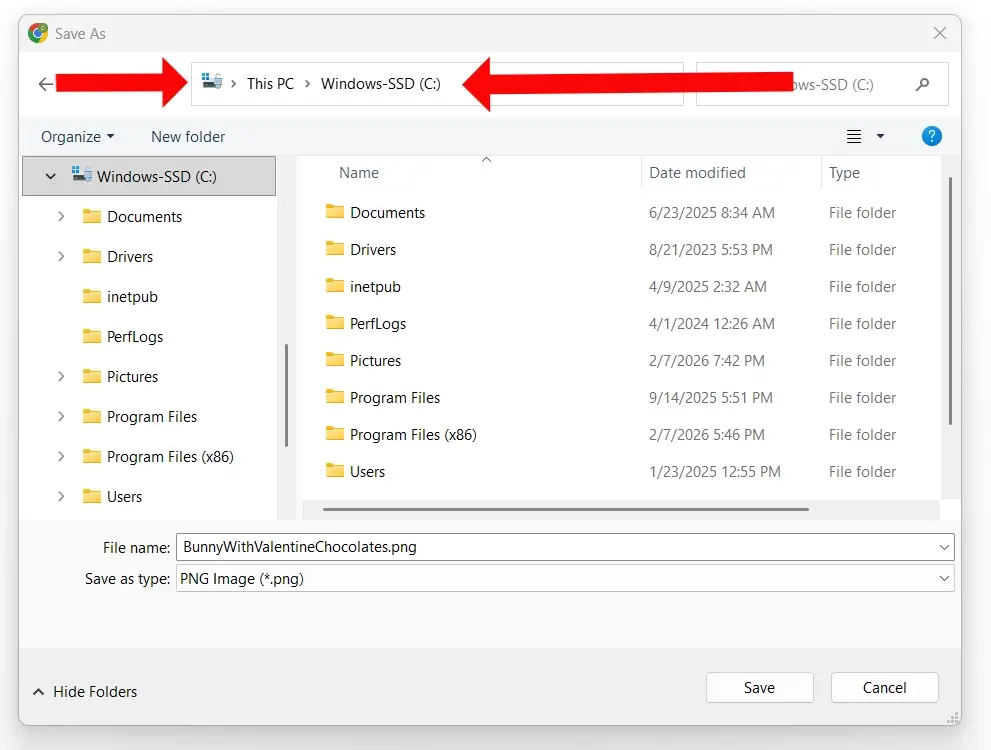
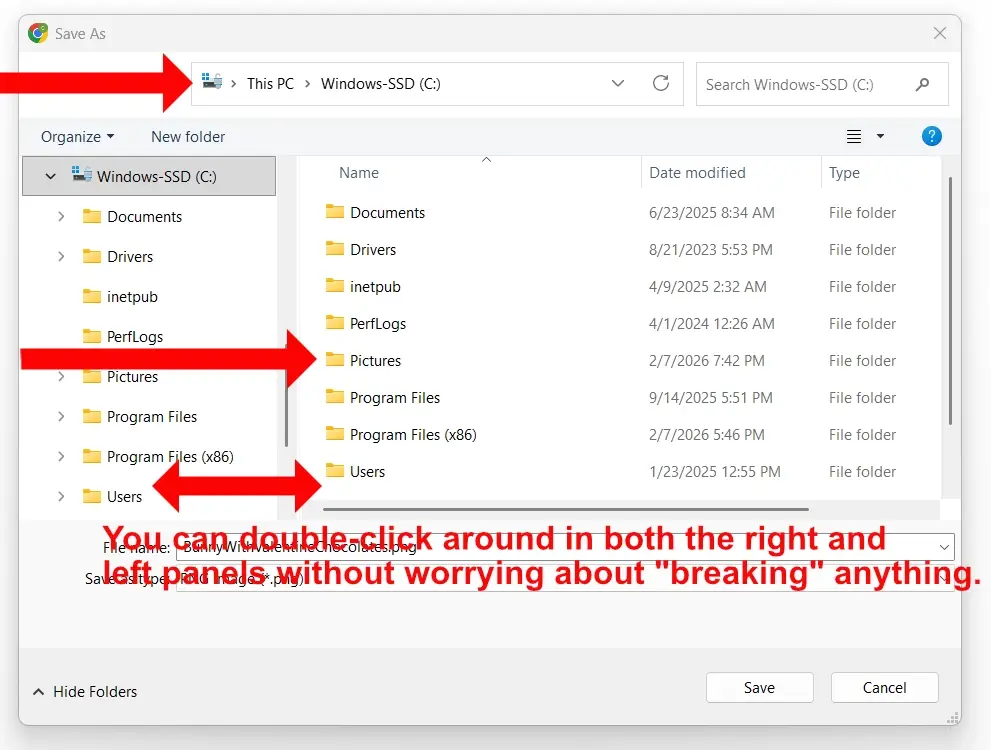
Step 5: This is the same image that is shown in Step 4 above. The red arrows below show where your computer is currently “set” to save downloaded files. Your save location might look different from this image, but that’s fine—in the next step, I will show you how you can easily change it to a folder/location you’ll remember! Actually remembering where you saved your images is super important — unless you enjoy the thrilling scavenger hunt of “I downloaded this 5 minutes ago and it’s already in the Bermuda Triangle of my computer!”
Step 6: First off, my recommendation is that since what you are downloading is an image (a picture), the most pertinent/appropriate place to download them is your yellow “Pictures” folder.
Below, again, is the exact same image that was shown in prior steps above, showing the same computer “save location” as before (see the top red arrow in the image below).
Within the right side panel in the image below, make note of the middle red arrow that is pointing at the yellow “Pictures” folder. This “Pictures” folder is where I recommend you save your downloaded images.
Don’t see a yellow “Pictures” folder? Don’t worry — you probably have one! Try double-clicking the yellow folders in the left panel (see third arrow down in the image below) to try and find it. Feel free to click around both panels to explore—you can’t break anything or delete files by doing this. You’re simply browsing your computer’s folders to choose where to save your image.”
If you absolutely cannot locate a yellow “Pictures” folder, you can choose any other yellow folder to save your images in. It will be very important that you make note of, and remember, which yellow folder you save your downloaded image in, or you may not be able to find it later. In the next step, I will provide further information regarding downloading an image into the correct folder.
For the remainder of this tutorial, I will refer to my yellow “Pictures” folder as being the download folder. If you are saving your image(s) into another folder, follow the instructions in the tutorial but use your chosen yellow folder.
Step 7: Here is, once again, the good ol’ “Save As” window! Don’t click “”Save” yet!
In this screenshot, I have already double-clicked my yellow “Pictures” folder that was in the right side panel. Now in the top bar area, designated by the top red arrow in the image below, you can see that the save destination is my yellow “Pictures” folder. You will also notice that the left-side panel now shows that my yellow “Pictures” folder is highlighted in light grey. Both of these tell me that I have correctly chosen, and told my computer, to save the image in my yellow “Pictures” folder.
Move on to Step 8 now regarding the file name you want your image to have.
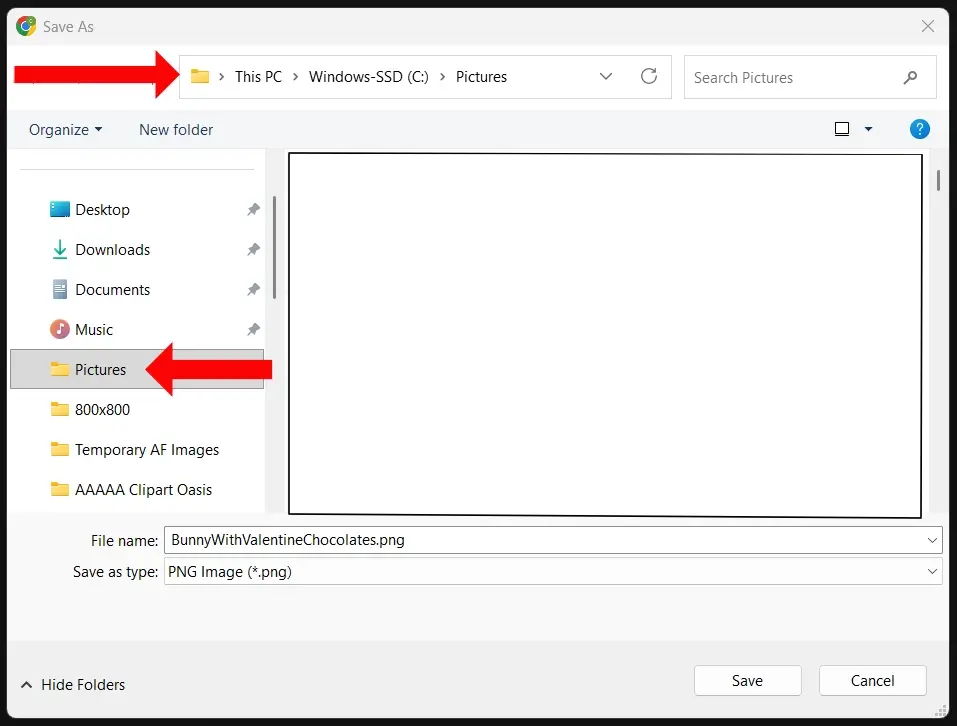
Step 8: There is one thing remaining that you may need to address, although it’s not totally necessary. That is the file name you assign to your new image. If you review the image below, you will see that this image already has a file name of “BunnyWithValentineChocolates.png” in the “File Name” box at the bottom. Refer to the top set of two red arrows in the image below.
This one’s pretty easy — you can choose to either keep the name already assigned that is showing in that area, or you can give it a different name, if you prefer…totally your choice! If you want to change the file name, simply single-click in the file name box, highlight the file name already in there (including the .png part at the end of the file name – or possibly .svg if you are downloading a .svg file instead of a .png), and start typing to enter a new file name. For clarification regarding where the file name area is, refer to the top red arrow in the image below.
Directly below the file name box is another box titled “Save as type” box. Refer to the second set of two red arrows in the image below. Leave this as is and DO NOT CHANGE THIS. For the purpose of downloading images from Clipart Oasis, you will either see a .png file type or a .svg file type. If you change what is in this bottom box, you likely will corrupt your image and it won’t be usable.
So when you have the correct yellow folder chosen, as well as the correct file name, you can click the “Save” button on the bottom right (refer to the very bottom red arrow toward the right), and your image will then download and save into your chosen yellow folder. The image will then be available for you to use over and over again, as many times as you wish!
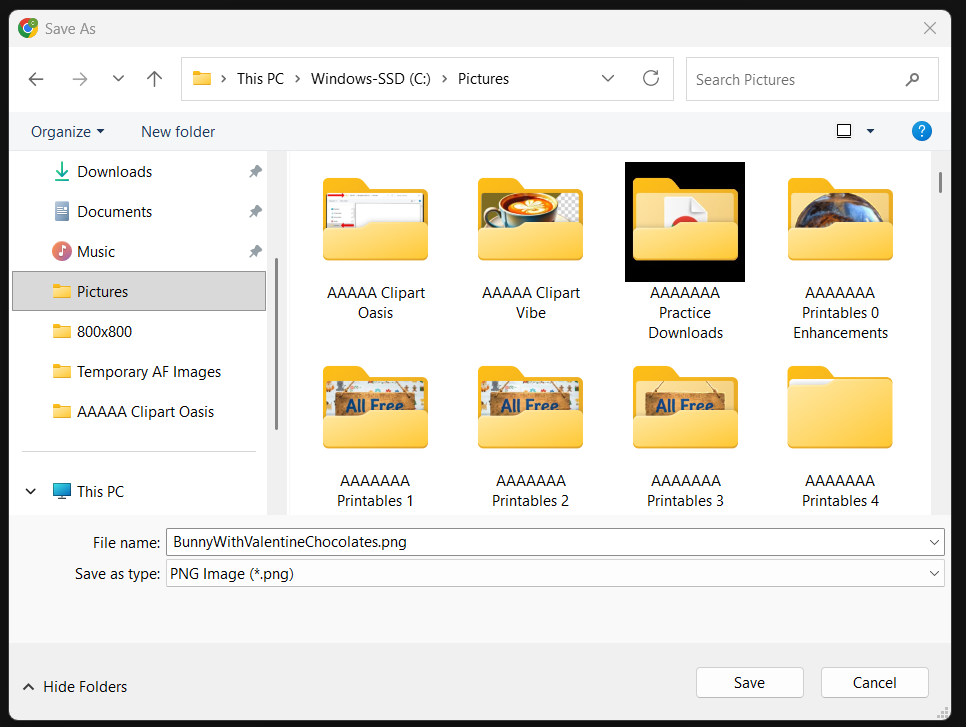
The End!!!!! You will at this point have downloaded your image, and will be able to access it in your yellow “Pictures” folder (or whichever other folder you chose to save your images in). I hope this tutorial was helpful! If you have any questions, comments, or suggestions, please feel free to contact me at HelpAtClipartOasis@gmail.com. Happy Downloading!
Cue the happy dance music, because you just leveled up from “confused clicker” to “download champion” in record time! And just like that, you’re now a certified Clipart Download Master! Frame this accomplishment next to your high school diploma, because honestly, this is probably more useful. Now go create something amazing, or at least something that will make your coworkers say ‘Wow, where did you get that cute bunny graphic? You can now hoard adorable graphics to your heart’s content! Go forth and decorate everything — your presentations, your greeting cards, that weird scrapbook project you started in 2019, or whatever else you can think of. The clipart world is your oyster!
